Rails supports many different types of automated tests to give developers a safety net to prevent breaking existing behavior when enacting changes to the project.
The Rails Guides website provides detailed documentation of all types of automated tests supported by the framework.
System testing is one of the options we have to cover our codebase with automated tests. System tests use a web browser to exercise the Rails application from the end-user perspective.
Compared to other types of tests, system tests give us the highest level of confidence that the application works as expected. But, on the other hand, they usually take longer to execute.
There are many moving parts involved in running a system test. Avdi Grimm did a great job in the blog post “Rails 6 System Tests, from Top to Bottom” where he unravels all the components involved in a system test and how they collaborate to test Rails applications from end-to-end.
The list below summarizes the blog post mentioned above, but reading the original text is highly recommended.
The list of components involved in running system tests are:
- The web browser: Chrome, Firefox, and others.
- WebDriver: a software program that allows us to interact with a browser programmatically. Each browser has its own WebDriver implementation, like ChromeDriver, GeckoDriver (for Firefox) and others. Rails includes a gem called webdrivers by default in the
Gemfilewhen generating an application. This gem installs the WebDrivers required to run the system tests. - selenium-webdriver: a Ruby gem that provides an interface to interact with any WebDriver.
- Capybara: a Ruby gem that runs the Rails application under test and provides a better interface on top of selenium-webdriver to write tests that interact with a web browser.
- MiniTest: the default test framework shipped in Rails.
Running system tests from a containerized Rails application is not straightforward since, most likely, the Docker image used to run the Rails application won’t have a web browser installed to execute the system test.
There are a few options to solve this problem. For example, we could install a web browser in the Docker image of the Rails application or configure Rails to use a web browser installed in the host machine. Avdi Grimm wrote about the later approach in the blog post “Run Rails 6 system tests in Docker using a host browser”.
This tutorial will follow a different approach. We will define a separate container to run the web browser and its respective WebDriver. The gem selenium-webdriver will point to the address of this container so it can interact with the browser.
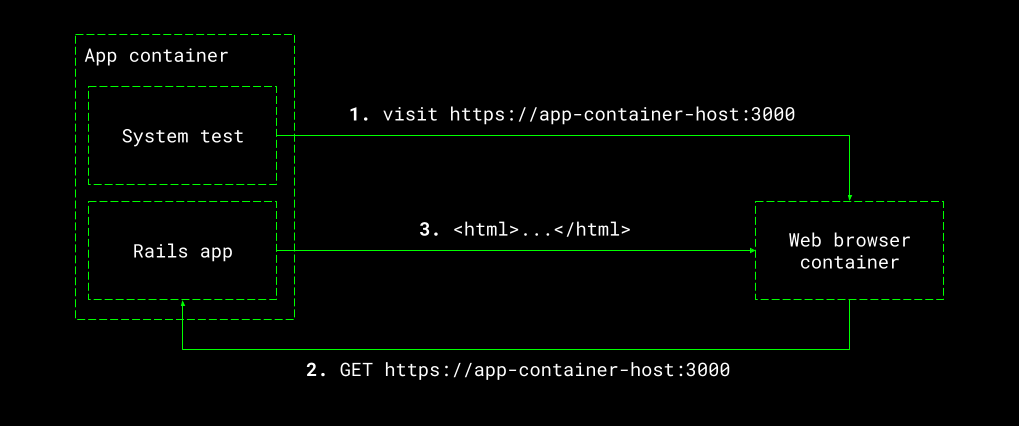
The image above illustrates how it will work. The application container will host two processes, one running the Rails application (initialized by Capybara) and the other running the system tests. First, the system test will reach out to the web browser container to send a command (1). Then, in the web browser container, the WebDriver will receive this command and execute the action in the web browser, which will perform a request to the application container (2). Finally, the Rails application will receive and respond to the request (3).
This approach is superior to the others mentioned above because:
- We don’t bloat the Docker image of the Rails application with web browsers that are only needed to run system tests.
- We don’t need to install web browsers on the host machine.
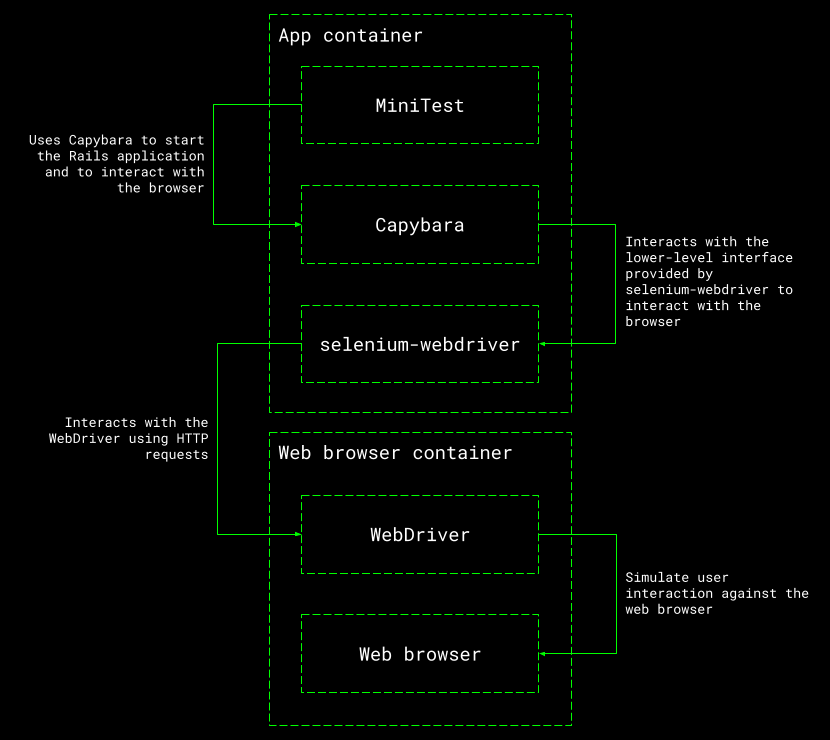
The following image illustrates where each component that plays a role in running system tests will reside:
In the previous blog post we generated a new Rails application using Docker. We will use the same setup in this tutorial to get a containerized Rails application.
The following is the docker-compose.yml file we will start with:
# ./docker-compose.yml
services:
  web:
    build: .
    ports:
      - "3000:3000"
    volumes:
      - .:/usr/src/app
    command: rails s -b 0.0.0.0
The next is the Dockerfile we will use in the tutorial:
# ./Dockerfile
FROM ruby:3.1.1

WORKDIR /usr/src/app

COPY . .
RUN bundle install
Given the two files above and a Rails application generated from scratch, what follows is a sequence of steps to change these files and the default Rails configuration to run system tests that rely on a web browser running in a separate container.
Step 1: Prepare the Rails application for testing
We will generate a few system tests by running the scaffold generator:
docker-compose run web bin/rails g scaffold post title:string body:text published:boolean
Once we run the command above, we can migrate the database to create the posts table:
docker-compose run web bin/rails db:migrate
We can now try to run the system tests generated by Rails:
docker-compose run web bin/rails test:system
The output is an error message that says:
Failed to find Chrome binary. (Webdrivers::BrowserNotFound)
The gem webdrivers raised this error message because it couldn’t find Chrome installed in the container.
Step 2: Exclude the gem webdrivers from the list of dependencies
Since we will install Chrome and its respective WebDriver in a separate container, we don’t need the gem webdrivers in the project:
# ./Gemfile
# Remove the line below from the Gemfile
gem "webdrivers"
After removing the dependency and rebuilding the Docker container, we can try to rerun the system tests:
docker-compose run web bin/rails test:system
The output this time will have a different error that says:
Unable to find chromedriver. Please download the server from...
Step 3: Point selenium-webdriver to a remote server
By default, selenium-webdriver will try to connect to a WebDriver in localhost. So let’s change that to point it to a remote address:
# ./test/application_system_test_case.rb
driven_by :selenium, using: :chrome, screen_size: [1400, 1400], options: {
  browser: :remote,
  url: "http://chrome-server:4444"
}
The address chrome-server:4444 doesn’t exist yet, but this is where we will make the Chrome WebDriver available for our tests later on.
Let’s try to rerun the system tests:
docker-compose run web bin/rails test:system
Once more, we get an error, but this time it says:
Failed to open TCP connection to chrome-server:4444 (getaddrinfo: Name or service not known)
Step 4: Introduce a container to run the web browser
The Selenium team maintains a list of images for running web browsers inside Docker containers.
The image selenium/standalone-chrome includes Google Chrome and its respective WebDriver, which by default runs on port 4444 as we configured in the step before. We will use this image to define a new docker-compose service we will call chrome-server and link it to the web service:
# ./docker-compose.yml
services:
  web:
    build: .
    ports:
      - "3000:3000"
    volumes:
      - .:/usr/src/app
    command: rails s -b 0.0.0.0
    links:
      - chrome-server
  chrome-server:
    image: selenium/standalone-chrome:96.0
Let’s rerun the system tests:
docker-compose run web bin/rails test:system
We should see Rails running each system test created by the scaffold command we executed early on, but they will all fail with a message like below:
Error:
PostsTest#test_should_create_post:
Selenium::WebDriver::Error::UnknownError: unknown error: net::ERR_CONNECTION_REFUSED
  (Session info: chrome=96.0.4664.110)
    test/system/posts_test.rb:14:in `block in <class:PostsTest>'
MiniTest captures a screenshot whenever a system test fails, so we can check what the web browser was displaying when the test failed. Rails keeps these screenshots in the folder tmp/screenshots, and this is the screenshot of the failing test we had above:
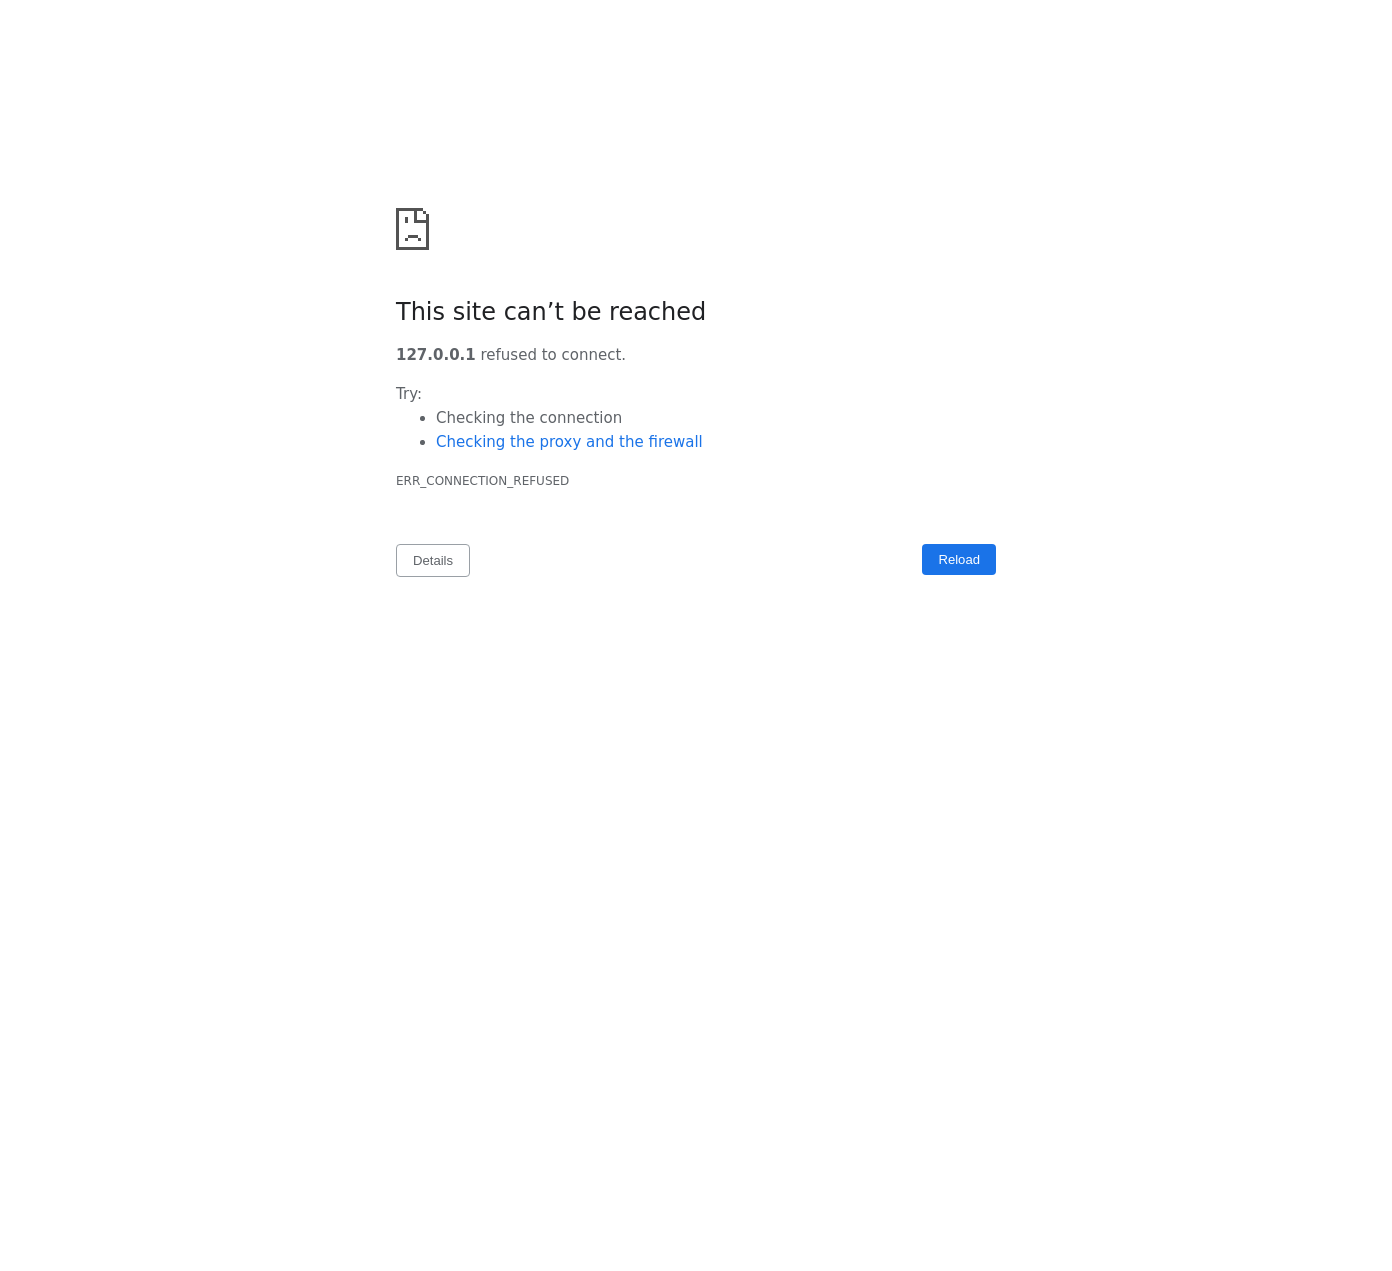
This screenshot proves that the test successfully interacted with the web browser, meaning that the new container is working and accessible to the selenium-webdriver gem.
The error we see in the screenshot shows that the web browser tried to access the address 127.0.0.1, the internal IP address of the chrome-server container, but it should instead use the host of the web container where the Rails application is running.
Step 5: Fix Capybara’s configuration
We need to change two settings in Capybara to fix the failing tests.
The first is the server_host. By default, Rails binds the server to the IP address 127.0.0.1, which is only locally accessible, making it impossible for the web browser running in another container to access the Rails application. To fix that, we set Capybara’s server_host to 0.0.0.0, which is accessible over the network.
The second attribute we need to change is the app_host, which defaults to the server_host. The problem is that the address 0.0.0.0 in the web browser container doesn’t point to the Rails application. So we set app_host to the address of the web service by using the HOSTNAME environment variable plus the port chosen by Capybara.
# ./test/test_helper.rb
Capybara.server_host = "0.0.0.0"
Capybara.app_host = "http://#{ENV.fetch("HOSTNAME")}:#{Capybara.server_port}"
We can now rerun the tests, and they should finally pass:
docker-compose run web bin/rails test:system
Step 6: Watch the tests run in the web browser
The Docker image we are using to run the web browser contains a VNC software installed, enabling us to peek into what is happening in the browser running in the container.
To enable this feature, we have to change the service chrome-server to expose port 7900, where the VNC client runs:
# ./docker-compose.yml
services:
  web:
    build: .
    ports:
      - "3000:3000"
    volumes:
      - .:/usr/src/app
    command: rails s -b 0.0.0.0
    links:
      - chrome-server
  chrome-server:
    image: selenium/standalone-chrome:96.0
    ports:
      - "7900:7900"
After this change, we restart the service to have the port exposed:
docker-compose up chrome-server -d
We can now access localhost:7900 and see a page that looks like the image below:
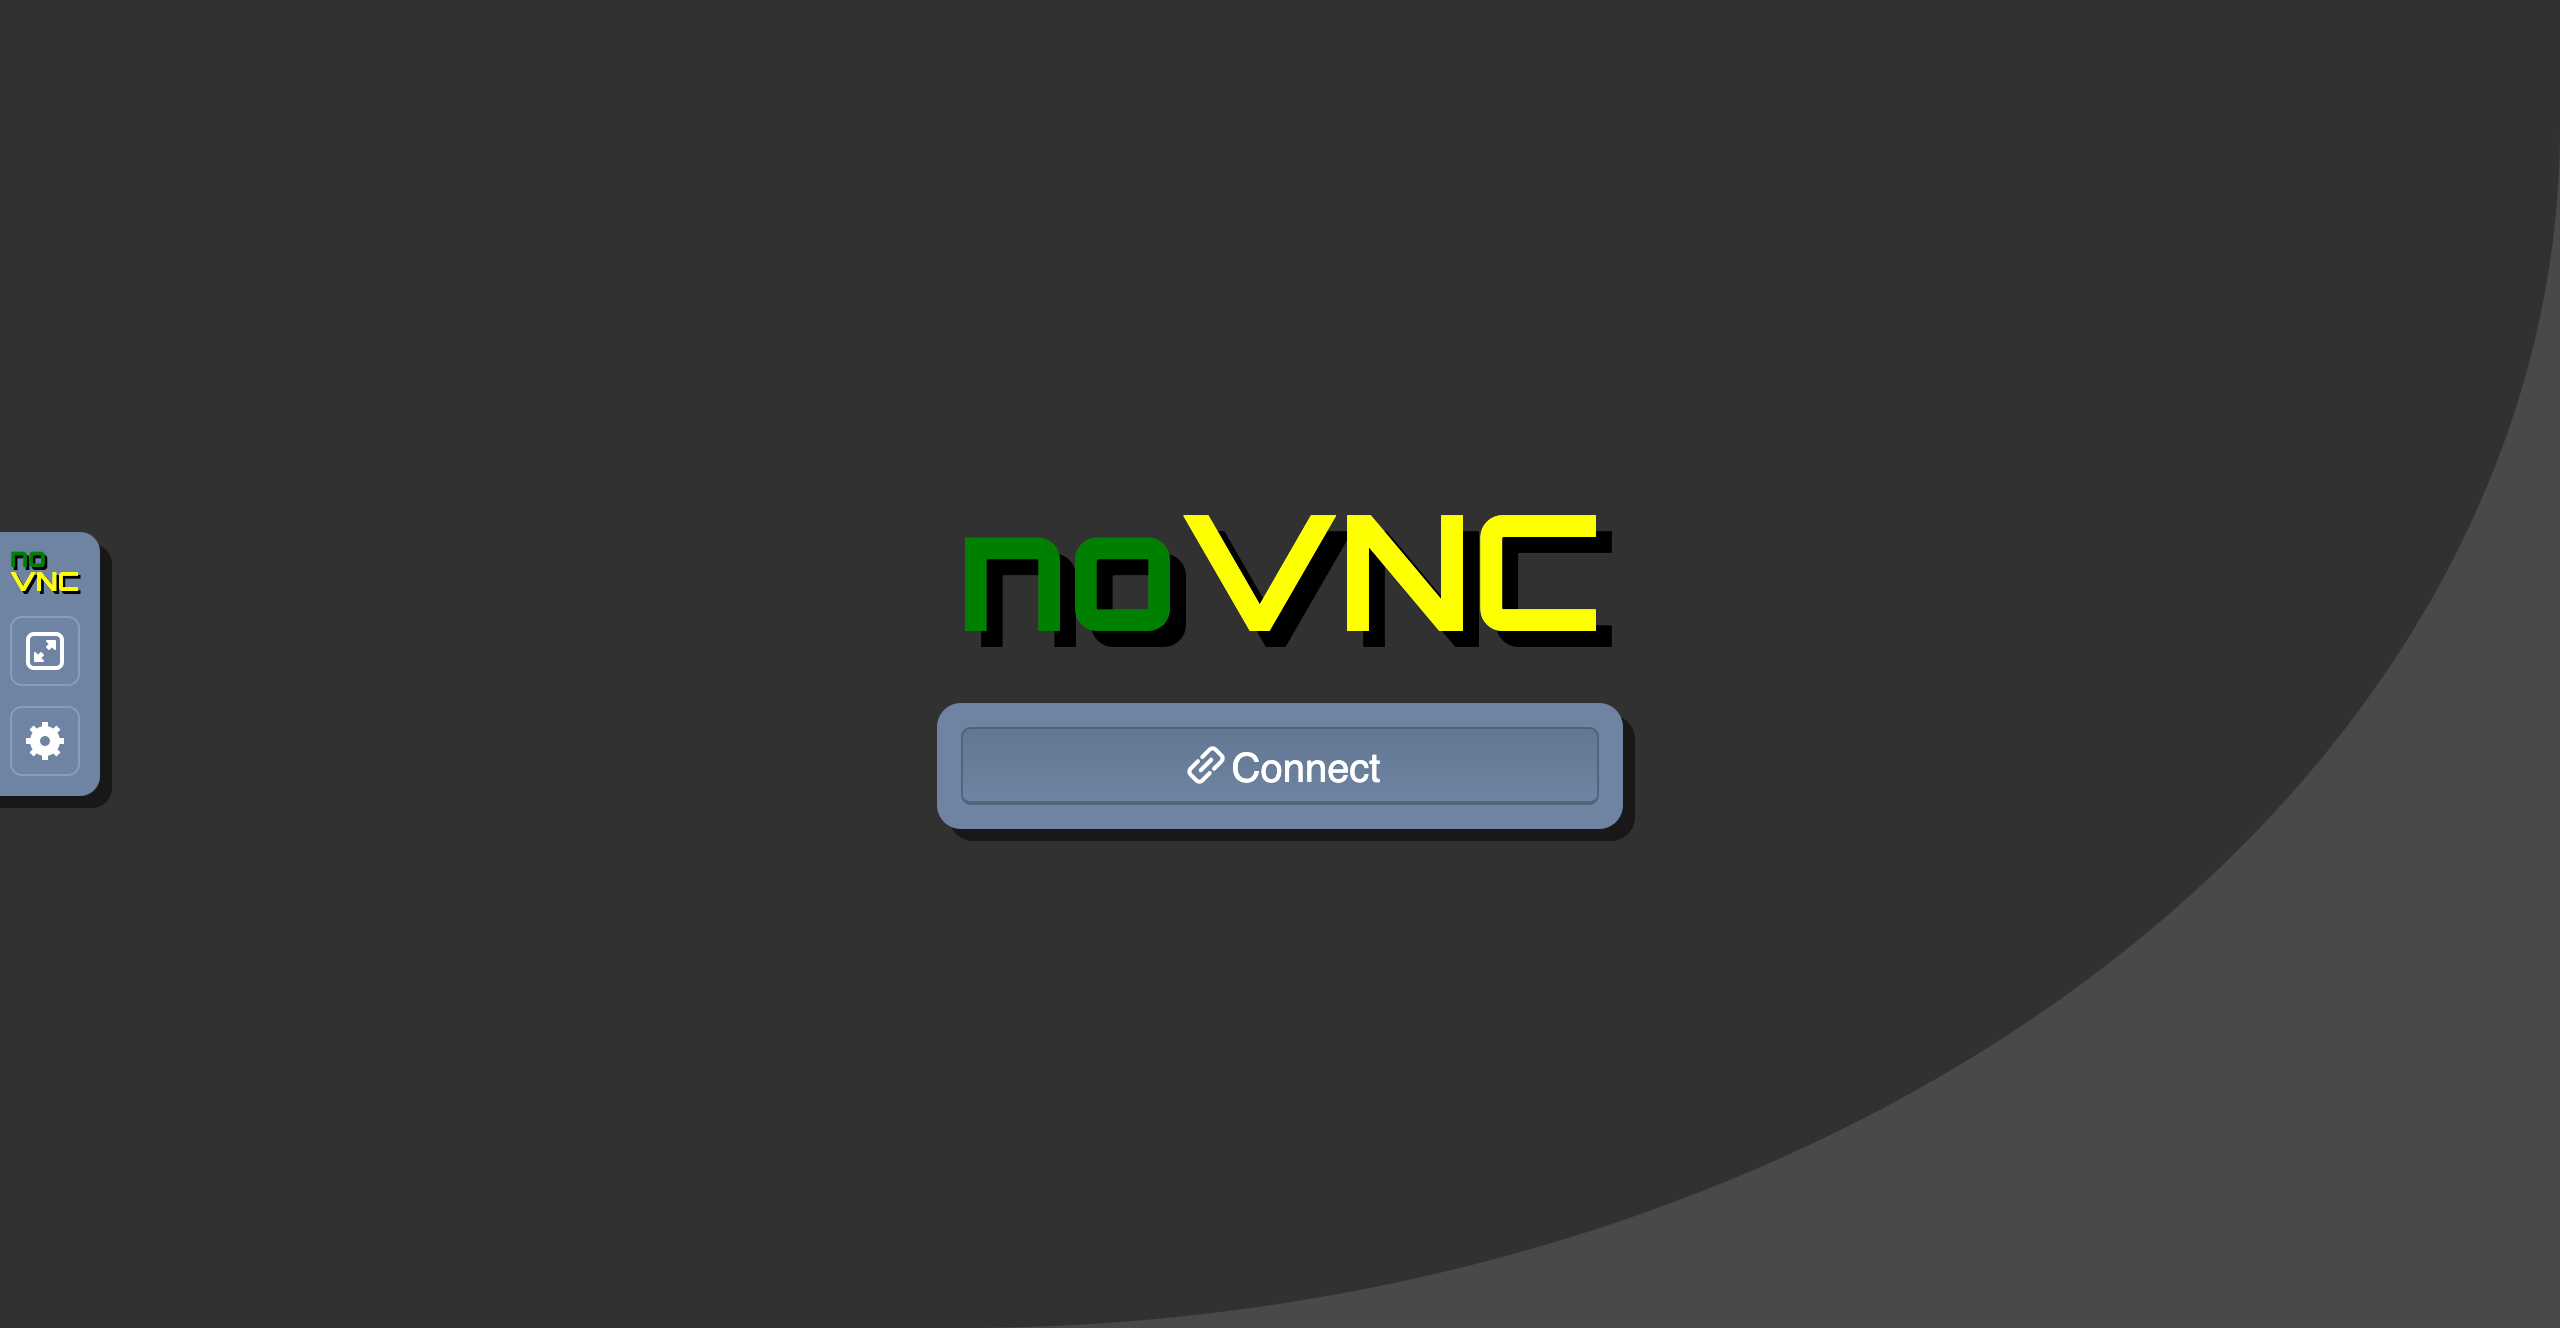
When we click on the button “Connect”, we can fill in the password with “secret” and move on.
We can now rerun the system tests and watch the test execution in the browser:
docker-compose run web bin/rails test:system
Bonus step: Support testing with other web browsers
With a few modifications to the new setup, we can run the system tests using any other web browser supported by Selenium.
We start introducing a new service to docker-compose to run a new web browser. In this case, we will add Firefox:
# ./docker-compose.yml
services:
  web:
    build: .
    ports:
      - "3000:3000"
    volumes:
      - .:/usr/src/app
    command: rails s -b 0.0.0.0
    links:
      - chrome-server
      - firefox-server
  chrome-server:
    image: selenium/standalone-chrome:96.0
    ports:
      - "7900:7900"
  # Add a new service running Firefox
  firefox-server:
    image: selenium/standalone-firefox:97.0
    ports:
      - "7901:7900"
Next, we parameterize with an environment variable the browser that the tests should use:
# ./test/application_system_test_case.rb
class ApplicationSystemTestCase < ActionDispatch::SystemTestCase
  driven_by :selenium, using: ENV.fetch("TEST_BROWSER"), screen_size: [1400, 1400], options: {
    browser: :remote,
    url: "http://#{ENV.fetch("TEST_BROWSER")}-server:4444"
  }
end
Finally, we can adjust the command that runs the tests to include an argument to specify the desired browser:
# Run tests with Firefox
docker-compose run --env TEST_BROWSER=firefox web bin/rails test:system

# Run tests with Google Chrome
docker-compose run --env TEST_BROWSER=chrome web bin/rails test:system
Conclusion
There we have it, a setup that enables us to run system tests without bloating the Docker image of our project or having to install web browsers in the host machine.
We haven’t tried yet, but this setup should enable us to do exciting things in a continuous integration platform like CircleCI. For example, we could configure the CI pipeline to run system tests in every browser we wish to support and have peace of mind that the changes we make to the project don’t break in different web browsers.